papernoodle
papernoodlepop@gmail.com
  • Paper sculptures
    • Avian >
      • Birds
      • Hummingbirds
    • Story illustrations
    • Plants
    • Architecture
    • Objects
    • Food
    • Figurative works
  • Pop-up
    • Jungle mural
    • Wall hanging soft pop-ups
    • Soft pop-up installation
  • Flickr
  • Animation
  • Publication
    • Books
    • Magazines
    • Newspapers
  • Bio
  • Blog
  • Shop
  • Contact

The Pop-up Book of Sex

12/31/2012

4 Comments

 
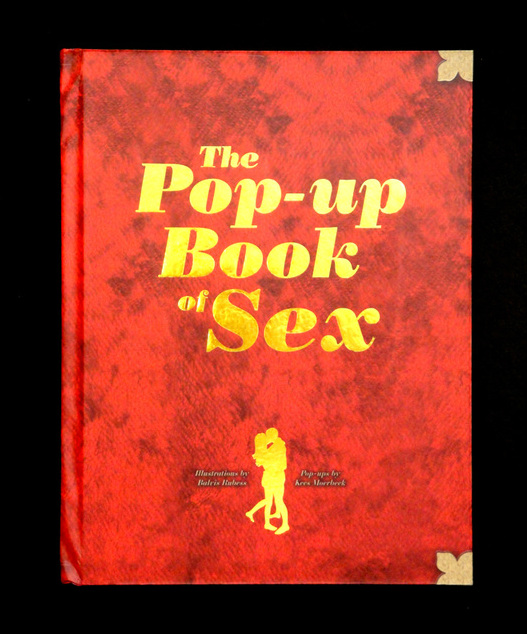
Hope everybody had a wonderful Christmas! It was really nice to see family and friends. I also got lots of presents, and..... look what I got! I'm not showing you what's inside, but I'll say that I'm very happy to have this book. I really appreciate the honest and diligently executed mechanisms. It'll put smile on your face. Very inspiring in so many ways. You're the best, Jeff!

The Pop-up Book of Sex
Illustrations by Balris Rubess
Pop-ups by Kees Moerbeek
Produced by Melcher Media
2006
Picture
4 Comments

Charlie Brown's Christmas Tree

12/16/2012

1 Comment

 
Have a happy holiday!
Picture


charlie_browns_christmas_tree.pdf
File Size: 1226 kb
File Type: pdf
Download File

Picture
You will need
  • 1 x paper grocery bag - print is okay
  • 1 x green paper
  • 1 x cardboard, about 8 x 10in (20 x 25cm)
  • Cutting mat
  • Scissors
  • Knife
  • Metal ruler
  • Glue
  • 1 x Christmas ornament

Picture
1. Cut the paper bag, so that you have a big flat sheet.

Picture
2. Roughly cut triangles that are about 20-24 inches (50 x 60cm) long, and 2-4 inch (5 x 10cm) wide on the bottom with scissors as many as you need.

Picture
3. Start rolling and twisting tightly in a winding direction about 1/3 of the triangle from the tip to make a branch. Repeat on the rest of your triangles. If you don't want to see the print on the branch, make sure the  printed side gets rolled in.

Picture
4. Take two branches, and hold the ends of the twisted parts together, and start twisting the two pieces about a couple of inches more.

Picture
5. Add more twisted triangles, one after another, and keep rolling and twisting them altogether to make a tree.

Picture
6. Cut the bottom clean and flat.

Picture
7. Using a knife and a metal ruler, cut 2 pieces of cardboard 3.5 x 9in (9 x 23cm) to make a base, and in the middle, make a hole as big as the width of your branch. Glue them together as shown in the picture.

Picture
8. Cut 6 small pieces out of cardboard, and stack 2 pieces. Put them aside, and make another stack of 2 pieces.

Picture
9. Glue the little stacks on both ends of the base piece that is on the bottom. Glue the rest of the little pieces on both ends of the base piece that is on top.

Picture
10. Flip the base, and put the tree in the hole.

Picture
11. Cut about 2 inch (5cm) long and 1 inch (2.5cm) wide piece out of green paper. Make cuts along the longer side to make pine needles, leaving the other edge uncut.

Picture
12. Put some glue on the uncut edge, and attach one corner to the tip of the branch. Tightly wrap the branch with the green paper in a little bit winding direction.

Picture
13. Decorate the tree with a Christmas ornament.

Picture
14. Cut and spread some pine needles around the tree.

1 Comment

David Wisniewski

12/9/2012

3 Comments

 
I found a couple of awesome awesome paper sculpture illustrated books at a Half Price Books years and years ago. The pictures just blew my mind, and told myself to look the artist up, but never did until a few months ago. I was very saddened by what I have found out about him. This year is the 10th year since he passed away. I felt shocked. Not only his works, but also the journey he took as an artist in 49 years of his life is truly inspiring and intriguing.

Here's a good reading about him, but basically, he was very into comic books early on, became a clown when he was an young adult, ran a shadow puppet theater after he got married, and then became a paper illustrator and an author. You can pretty much see all his life experiences reflected in his works: humor, terrific story telling, playfulness, drama, mastery in  compositions, color, animating the characters and cutting paper. I'd like to celebrate and share his exquisite paper art before this year ends. Click the images to see them bigger.
 
Picture
Picture
 
Picture
Picture
 

Picture
Picture
 

Picture
Picture
 
Picture
Picture
3 Comments

Working on a how-to book

12/2/2012

0 Comments

 
I'm back to my paper sculpture how-to book project. It's been roughly a year and a half since I started working on this project with the GMC publications(UK). I didn't imagine it would be taking this long, but it has. This project has been not just work, but quite an event in my life. This event taught me many things, and changed me as a person. Hopefully, I'm a little bit better person now.

Due to too much work load on my first editor, two new editors are assigned to this book, and I've been doing a lot of catching up with them. I like these fresh eyes, and the book is only getting better and better. There's not much I can share with you at the moment, but it's getting there.
0 Comments

    Author

    Cheong-ah Hwnag
    Paper sculptor
    Columbus, Ohio USA

    RSS Feed

    Archives

    December 2012
    November 2012
    October 2012
    September 2012

    Categories

    All
    Christmas
    Halloween
    How-to Book
    Inspirations
    Paper Crafts
    Paper Sculpture
    Pop Up
    Soft Pop Up Test
    Studio
    Work

Powered by Create your own unique website with customizable templates.