papernoodle
papernoodlepop@gmail.com
  • Paper sculptures
    • Avian >
      • Birds
      • Hummingbirds
    • Story illustrations
    • Plants
    • Architecture
    • Objects
    • Food
    • Figurative works
  • Pop-up
    • Jungle mural
    • Wall hanging soft pop-ups
    • Soft pop-up installation
  • Flickr
  • Animation
  • Publication
    • Books
    • Magazines
    • Newspapers
  • Bio
  • Blog
  • Shop
  • Contact

Grimm Tales for Young and Old by Philip Pullman

10/28/2012

2 Comments

 
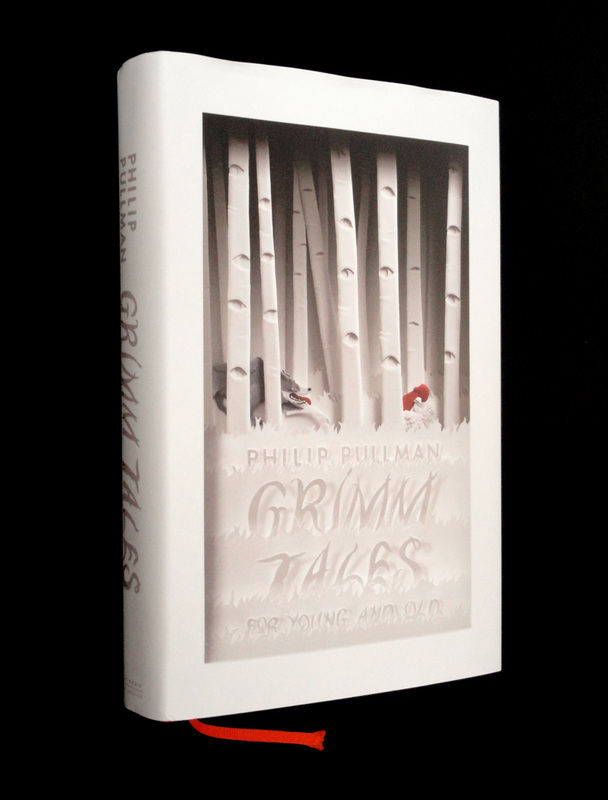
I finally received 3 copies of "GRIMM TALES for YOUNG and OLD" I ordered from Amazon UK, and have been reading it. I was delightfully surprised that the cover has nothing but my artwork, no additional fonts or logo or what so ever. The books came with pretty red book markers which all were placed on 'Little Red Riding Hood' story. I'm about half way now, and the book is incredibly easy to read. I read the stories to my 8 year old son in his bed time. The author's writing really makes me feel like I'm telling a story rather than reading a book. There are a few spots here and there I skip for my son just because I need to do some explaining, and I'm not ready yet. Other than that he's been enjoying the stories very much. I have read other translated version of Grimm Tales, but Philip Pullman's version makes more sense while still keeping all the silliness, raw brutality, magic and humor, and therefore I can picture better in my head. It makes me wanna make a paper illustration for every page. This version is to be released in US soon, but it won't be the same cover I did.
Picture
2 Comments

Paper zombie mask

10/21/2012

5 Comments

 
Halloween is just around the corner! Here's a fun project for you. Try this, and send me a picture. Show me how yours turned out. I will post it on my blog.
Picture


paper_zombie_mask.pdf
File Size: 1963 kb
File Type: pdf
Download File

Picture
You will need
  • 1 x white poster board or card stock - sturdier the better for the head band(skull)
  • Few sheets of light weight card stock or tissue paper - color of your choice for the hair
  • 1 x yucky green paper - light to medium weight, big enough to cover your entire face
  • 1 x yellowish or brownish paper - for the teeth
  • 1 x red paper - for blood
  • 1 sheet of white tissue paper - for the eyeballs
  • 1 package of 20 x 26in (50 x 66cm) pale pink gift wrapping tissue paper - for the brain, you need one sheet, but you'll probably need more than one to practice
  • Scissors
  • X-Acto knife(optional - if you use one, you'd need a cutting mat or a sheet of thick scrap cardboard)
  • White glue
  • Small paint brush or scrap paper strip
  • Pencil

Picture
1. Cut 2 inch (5cm) wide strips out of white paper for the skull as many as you need, and glue the ends together to make one long strip that can wrap around your head. Loosely fit the head band on your head, and cut it 1/2 inch (1cm) longer than the fit for gluing. Glue the ends.

Picture
2. Cut a sheet of pink tissue paper roughly 3 times larger in diameter than the skull.

Picture
3. Give it a good crumple.

Picture
4. Gently open the crumple until it becomes as big as the skull, flattening the center of the paper while keep the edges crumpled as much as possible to form a blob.

Picture
5. Put a small amount of glue on one edge. Gather the edge a little bit. Hold it until the glue sets. Carefully let go of the tissue paper, and dry off any wet glue on your fingers for your next gluing. Glue the opposite side of the blob, and then in between the glued areas till the shape is evenly secured.

Picture
6. Pour some glue on a piece of scrap paper or plastic. Thinly apply a little bit of glue in the middle of the blob with a paint brush.

Picture
7. Pinch the glued area from underneath the blob. Carefully let go of the tissue paper, and dry off any wet glue on your fingers. Glue a few inches further next to the first glued spot.

Picture
8. Make sure your fingers are dry in between gluing. After a few gluing, let it dry a little. Repeat gluing in between the glued spots until the blob is divided into two sections.

Picture
9. Apply glue on one edge of the brain, and attach it to inside of the skull.

Picture
10. Repeat on the opposite side, and then in between the glued areas until the brain is evenly secured to the skull.

Picture
11. Crumple and flatten the green paper few times to get a weathered look. A little tear here and there is perfectly okay. Cover your face completely with the paper. Feel your eye sockets, nose, and mouth, and mark them on the paper with a pencil.

Picture
12. Cut out the eye sockets. Tear the nose part out. Cut the paper all across the mouth area. Cut the paper in the shape of a skull as shown in the photo.

Picture
13. Cut about 1 1/2 inch (4cm) wide strip long enough to fit along the mouth. Give some short cuts along one edge for the teeth, leaving 1/2 inch (1cm) of the opposite edge uncut.

Picture
14. Glue the teeth to the back of the mouth, and then bend some teeth outwards.

Picture
15. Cut a dripping blood shape out the red paper, and glue it to the back of the mouth.

Picture
16. Cut 2 circles out of white tissue paper about twice larger in diameter than the eye sockets. 

Picture
17. Crumple each circle and form a blob just like you did for the brain, and attach the eyeballs from the back of the face. Cut, or tear a little hole on each eyeball, so that you can see through.

Picture
18. Put the brain on your head. Put the zombie face on your face, looking at a mirror. Fold the top of the forehead back, and position the face on the skull, showing about 1/2 inch (1cm) of the skull. Take the mask off. Put glue on the folded area, and attach it to the skull.

Picture
19. Connect the paper for the hair to be long enough to cover your head except for the face. Fold one of the longer side edges over, about 2 inches (5cm). Cut strips on the larger area all the way to the fold.

Picture
20. Crumple the hair if you'd like. Put glue on the uncut side of the fold, and attach it to the remaining skull.

5 Comments

This is where I work

10/14/2012

0 Comments

 
Wow! I finally managed to clean up my studio after working on my how-to book for so many months. I really didn't think it would be possible to have my clean studio back. I'm so happy now.
 
Picture

My windows are pretty much covered all the time because UV rays are harmful to paper. My studio is never too humid or too dry. We don't have pets anymore, but even when we did, pets were never allowed in the studio. It's a big no no for me. I have work tables and chairs, many shelves and storage, piles of books, art works, frames, a paper trimmer, a mat cutter, a handheld vacuum cleaner, a dry mop, and of course lots and lots of paper.

 
Picture
My sweet dear father-in-law made these wooden shelves for me like 10 years ago. I separate acid free paper and non acid free paper. I store my acid free paper in archival storage boxes(you see those grey boxes?). I have a box for white papers, and a box for color papers. I also divide papers to big, medium and small sizes, and store them separately.

 
Picture
I sort papers with similar hues.

 
Picture
On my work table, I have many cutting mats in different sizes. I have a desk organizer. I also have a tool bag, so that I can carry my tools to some place else.

 
Picture
On the other side of my studio, I have a closet full of more stuff, photo equipment, shipping materials, and files. I even have an entertainment system. I'm so lucky to have my own space to do what I love to do. If you would like to try paper craft, you wouldn't need a studio like mine. A dining table, a cutting mat, a small tool bag, and a small paper storage can give you a good start.

0 Comments

"GRIMM TALES" animation

10/7/2012

0 Comments

 
So cute! The very talented animator Matthew Young (http://www.mymymy.co.uk/) from Penguin Books made a short animation with my paper sculptures.The voice is the author himself. I can't believe it!

Paper animation

One of the things that I love about paper is that you can make pretty much anything with it. You can even make movies, too. Here are some links that give me great inspirations.

Click here to see Animation trends
Check out Construction paper animations
Learn about Cutout animation
Hedgehog in the fog (1975) by Yuri Norstein
Les Trois Inventeurs (1980) by Michel Ocelot
Silhouette animation (1926) by Lotte Reiniger
More Lotte Reiniger
Tutorial using Adobe After Effects part 1 by Paper People Jokes
Tutorial using Adobe After Effects part 2 by Paper People Jokes
0 Comments

    Author

    Cheong-ah Hwnag
    Paper sculptor
    Columbus, Ohio USA

    RSS Feed

    Archives

    December 2012
    November 2012
    October 2012
    September 2012

    Categories

    All
    Christmas
    Halloween
    How-to Book
    Inspirations
    Paper Crafts
    Paper Sculpture
    Pop Up
    Soft Pop Up Test
    Studio
    Work

Powered by Create your own unique website with customizable templates.